Quick Start
Learn how to use Kumo to query the future using this easy-to-follow example.
This Quick Start demonstrates how to use Kumo to predict customer churn (i.e., which active customers will stop buying) in just a few minutes.
Prerequisites
- Sign Up for a Free Trial: If you haven't already, sign up for a free trial at Kumo Free Trial.
- [Snowflake Native app Only]: Ensure the Kumo app is installed and started. If you haven't already installed or started Kumo, follow the instructions on how to install Kumo for SPCS.
What You Will Learn in This Quick Start
You will learn how to use Kumo's graph neural networks (GNNs) to predict customer churn. This Quick Start uses the H&M Personalized Fashion Recommendations dataset, which includes detailed information about customer transactions, articles, and customers. As you will see in this tutorial, the Kumo GNN is highly effective at learning the relational patterns between customers and articles, resulting in a model with extremely high accuracy.
The dataset is organized into three main tables:
- Customers: Contains information about the customers, such as customer ID, name and status.
- Articles: Contains information about the articles, such as article ID, name and category.
- Transactions: Contains transaction details, including transaction ID, customer ID, article ID, transaction date, quantity, and price.
Depending on your database, you can either directly go to Step 1 and add the data via an AWS S3 link to Kumo, or—if you are accessing Kumo via SPCS—you should start with uploading the data to your Snowflake account via Step 0
Step 0 [Snowflake Native app]: Upload Data to Your Snowflake Account
See details
Follow these steps to upload the H&M data:
-
Log into your Snowflake account.
-
Upload data either via the UI or programmatically
i. Via UI: Download the data from the following links and upload them to your Snowflake account using the Snowflake UI:
- Customers: customers.parquet
- Articles: articles.parquet
- Transactions: transactions_train.parquet
ii. Or programmatically:
-- This script loads the H&M Personalized Fashion Recommendations dataset from S3 into Snowflake tables -- Kaggle Dataset: https://www.kaggle.com/competitions/h-and-m-personalized-fashion-recommendations/data -- Define variables for database and schema SET DATABASE_NAME = 'KUMO_DB'; SET SCHEMA_NAME = 'HNM'; -- Create database/schema if not exists CREATE DATABASE IF NOT EXISTS IDENTIFIER($DATABASE_NAME); SET FULL_SCHEMA_NAME = CONCAT($DATABASE_NAME, '.', $SCHEMA_NAME); CREATE SCHEMA IF NOT EXISTS IDENTIFIER($FULL_SCHEMA_NAME); -- Create or replace the external stage CREATE OR REPLACE STAGE kumo_hnm_stage URL='s3://kumo-public-datasets/Kaggle_H&M/parquet/' FILE_FORMAT = (TYPE = PARQUET); -- Section: Transactions Table -- Create the transactions table SET TRANSACTIONS_TABLE_NAME = CONCAT($FULL_SCHEMA_NAME, '.transactions'); CREATE TABLE IF NOT EXISTS IDENTIFIER($TRANSACTIONS_TABLE_NAME) (T_DAT VARCHAR, CUSTOMER_ID VARCHAR, ARTICLE_ID NUMBER(38, 0), PRICE FLOAT, SALES_CHANNEL_ID NUMBER(38, 0)); -- Copy data into the transactions table COPY INTO IDENTIFIER($TRANSACTIONS_TABLE_NAME) FROM ( SELECT $1:t_dat::VARCHAR, $1:customer_id::VARCHAR, $1:article_id::NUMBER(38, 0), $1:price::FLOAT, $1:sales_channel_id::NUMBER(38, 0) FROM @kumo_hnm_stage/transactions_train.parquet ) FILE_FORMAT = (TYPE = PARQUET) ON_ERROR = ABORT_STATEMENT; -- Section: Articles Table -- Create the articles table SET ARTICLES_TABLE_NAME = CONCAT($FULL_SCHEMA_NAME, '.articles'); CREATE TABLE IDENTIFIER($ARTICLES_TABLE_NAME) ( article_id NUMBER(38, 0) , product_code NUMBER(38, 0) , prod_name VARCHAR , product_type_name VARCHAR , product_group_name VARCHAR , graphical_appearance_name VARCHAR , colour_group_name VARCHAR , perceived_colour_value_name VARCHAR , perceived_colour_master_name VARCHAR , department_name VARCHAR , index_name VARCHAR , index_group_name VARCHAR , section_name VARCHAR , garment_group_name VARCHAR , detail_desc VARCHAR ); -- Copy data into the articles table COPY INTO IDENTIFIER($ARTICLES_TABLE_NAME) FROM ( SELECT $1:article_id::NUMBER(38, 0), $1:product_code::NUMBER(38, 0), $1:prod_name::VARCHAR, $1:product_type_name::VARCHAR, $1:product_group_name::VARCHAR, $1:graphical_appearance_name::VARCHAR, $1:colour_group_name::VARCHAR, $1:perceived_colour_value_name::VARCHAR, $1:perceived_colour_master_name::VARCHAR, $1:department_name::VARCHAR, $1:index_name::VARCHAR, $1:index_group_name::VARCHAR, $1:section_name::VARCHAR, $1:garment_group_name::VARCHAR, $1:detail_desc::VARCHAR FROM @kumo_hnm_stage/articles.parquet ) FILE_FORMAT = (TYPE = PARQUET) ON_ERROR = ABORT_STATEMENT; -- Section: Customers Table -- Create the customers table SET CUSTOMERS_TABLE_NAME = CONCAT($FULL_SCHEMA_NAME, '.customers'); CREATE TABLE IDENTIFIER($CUSTOMERS_TABLE_NAME) ( customer_id VARCHAR , FN FLOAT , Active FLOAT , club_member_status VARCHAR , fashion_news_frequency VARCHAR , age FLOAT , postal_code VARCHAR ); -- Copy data into the customers table COPY INTO IDENTIFIER($CUSTOMERS_TABLE_NAME) FROM ( SELECT $1:customer_id::VARCHAR, $1:FN::FLOAT, $1:Active::FLOAT, $1:club_member_status::VARCHAR, $1:fashion_news_frequency::VARCHAR, $1:age::FLOAT, $1:postal_code::VARCHAR FROM @kumo_hnm_stage/customers.parquet ) FILE_FORMAT = (TYPE = PARQUET) ON_ERROR = ABORT_STATEMENT; -
Inspect the tables:
While the data is being uploaded (which can take a few minutes), you can continue with Step 1 and connect your database to Kumo. After that, return to Snowflake to inspect the tables using the following queries:
-- View data from the transactions table
SELECT * FROM IDENTIFIER($TRANSACTIONS_TABLE_NAME) LIMIT 10;

-- View data from the articles table
SELECT * FROM IDENTIFIER($ARTICLES_TABLE_NAME) LIMIT 10;

-- View data from the customers table
SELECT * FROM IDENTIFIER($CUSTOMERS_TABLE_NAME) LIMIT 10;
Step 1: Set Up Your Connector
Setting up the connector ensures that Kumo can access your data, enabling seamless data integration for model training.
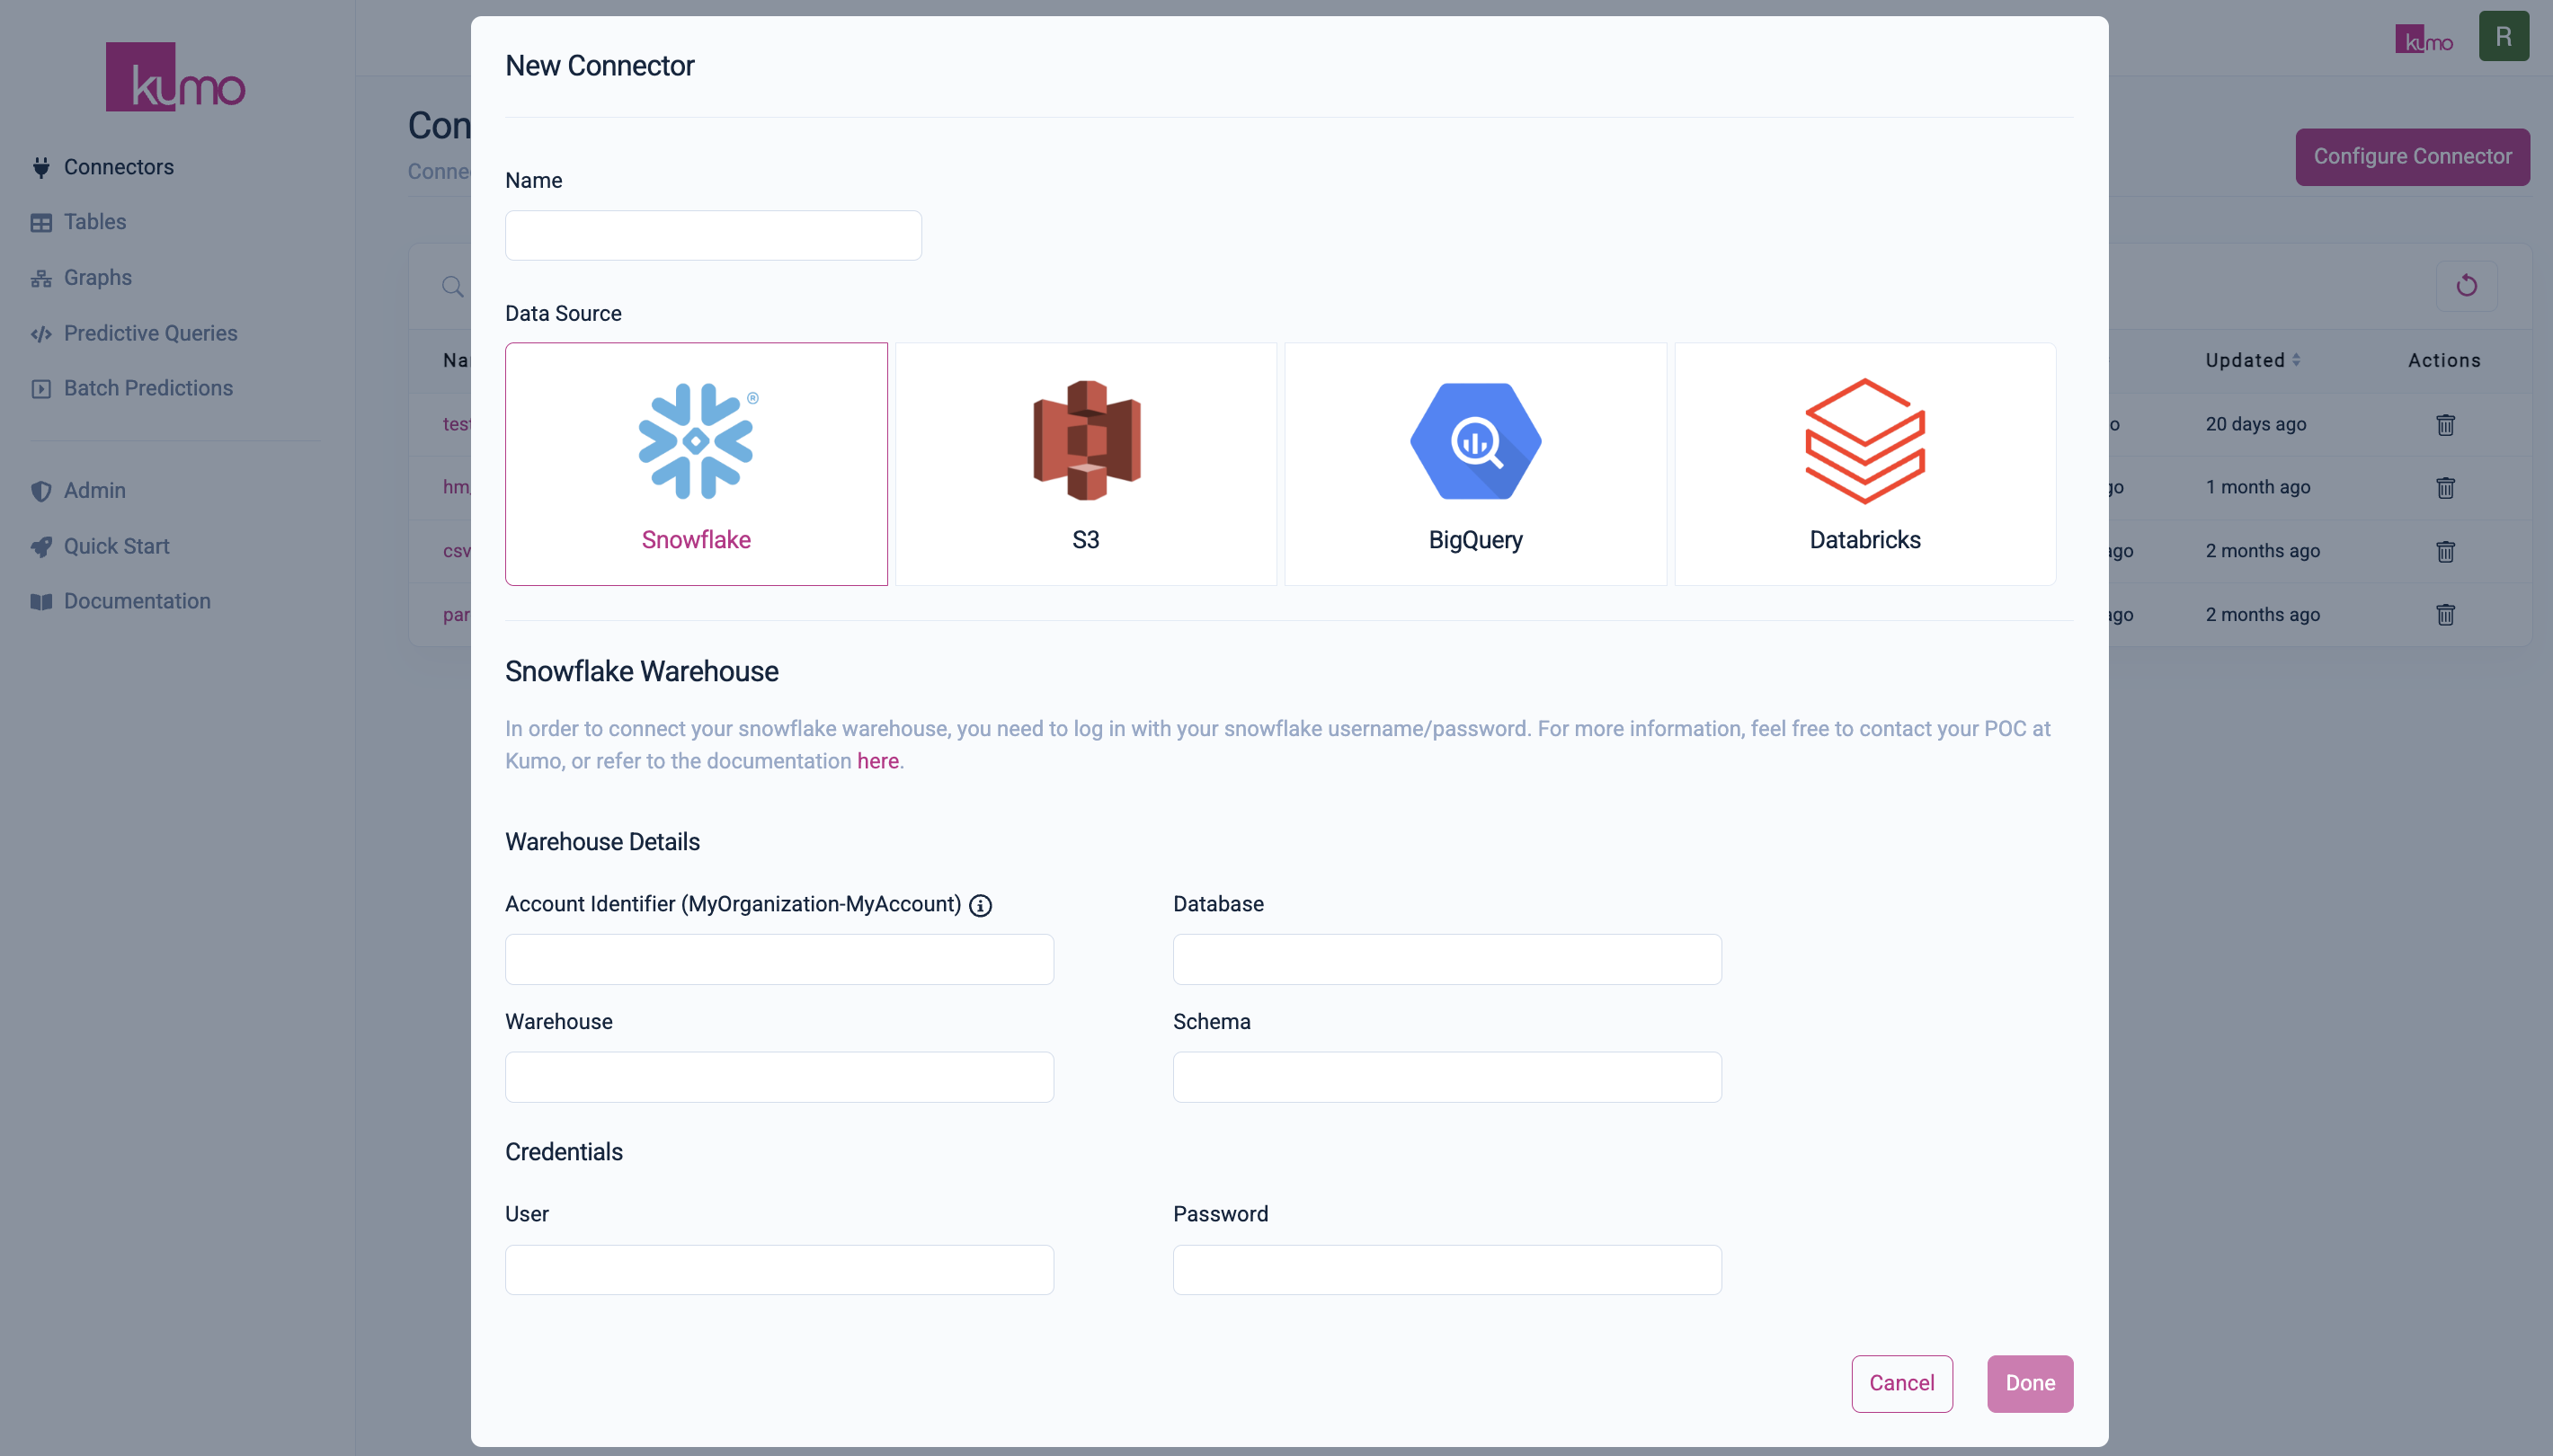
-
Open Connector Configuration:
- In the left-hand menu, click on
Connectors. - Click
Configure Connectorto open the "New Connector" modal window.
- In the left-hand menu, click on
-
Create a New Connector:
i. Provide a name for your new connector (e.g.,
hnm_connector).ii. Choose your data source:
-
For Snowflake Connector with Kumo SaaS deployment, follow the instructions here
-
For Snowflake Native app, follow the instructions here
-
For AWS S3:
- In the S3 Path textbox, enter:
s3://kumo-public-datasets/Kaggle_H&M_reduced/parquet/. - Click the
Validatebutton to see all files within the H&M public dataset directory. - More detailed instructions here.
- In the S3 Path textbox, enter:
-
For other data sources: See Data Connectors.
iii. Click
Doneto save the connector. -
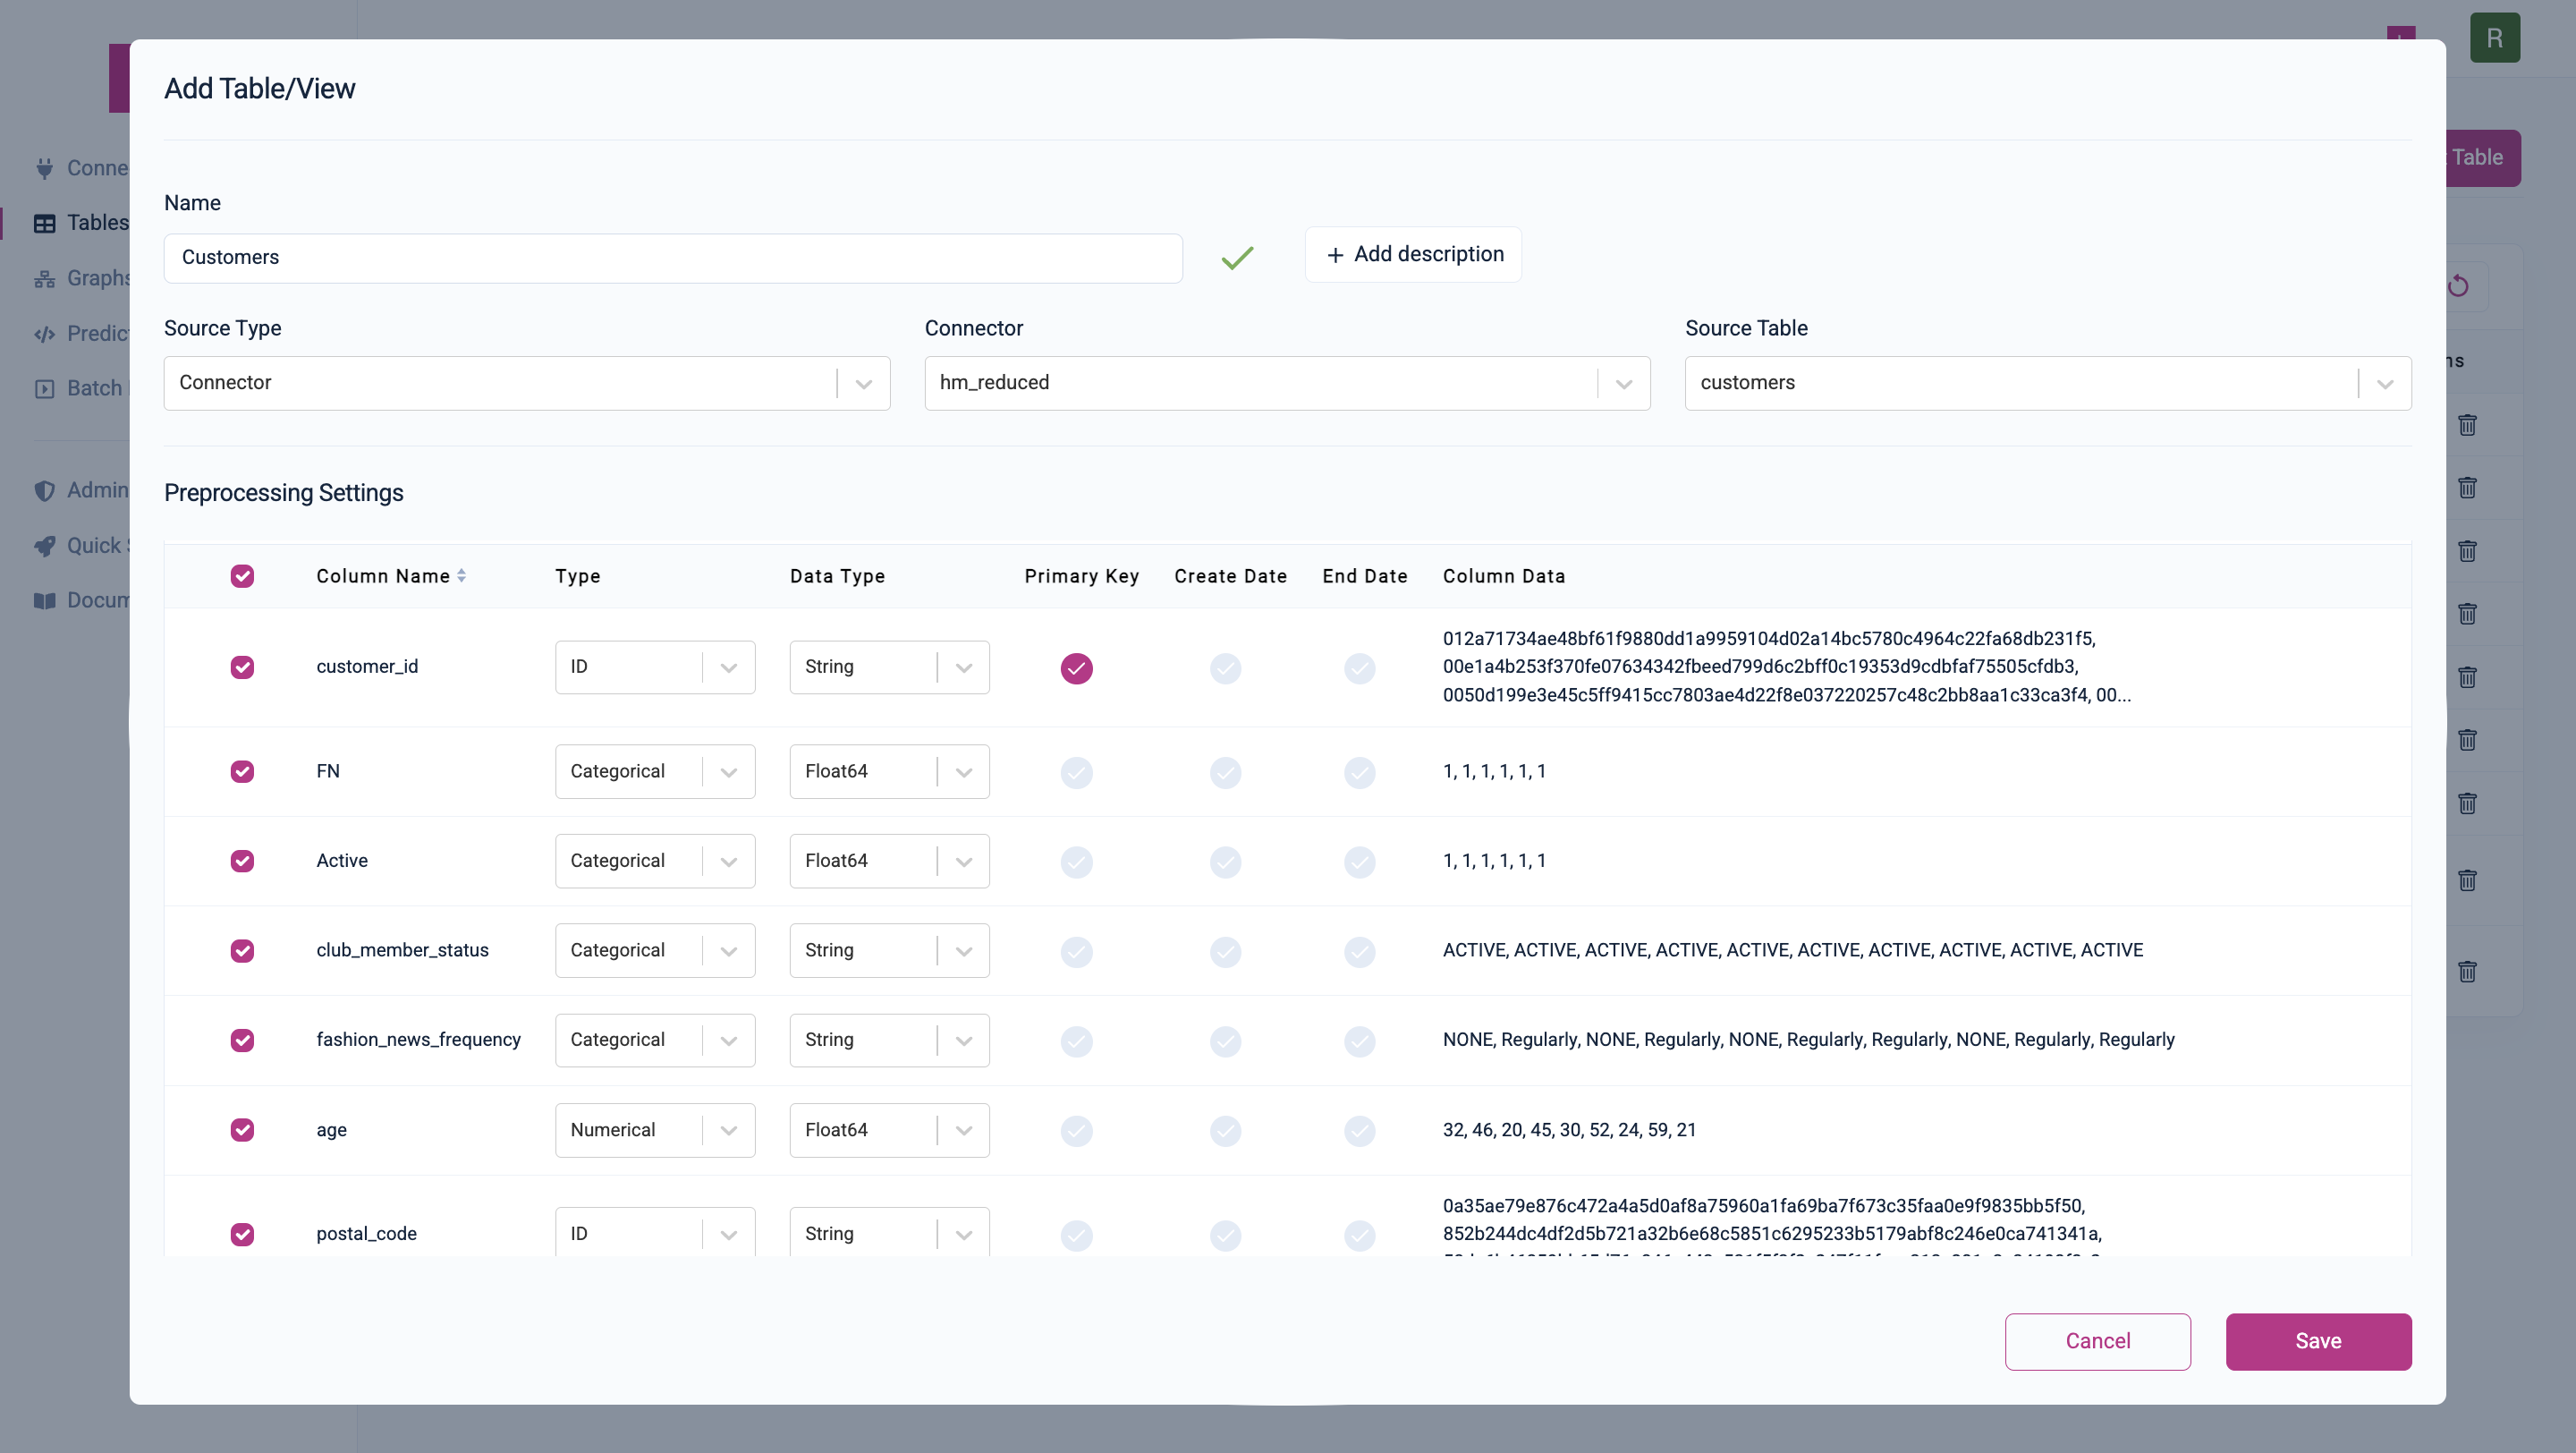
Step 2: Register Table Schema
Now that you've set up your connector, it's time to register the H&M dataset within Kumo. This step defines how columns are later encoded for the model and sets the requirements for the graph schema registration by defining the primary keys of each table.
-
Navigate to Tables Overview:
- In the left-hand menu, click on
Tables.
- In the left-hand menu, click on
-
Add Data Tables (Customers, Articles, Transactions):
Follow the steps for each table:
-
Click
Add Table. -
Set the table name (
ARTICLES,CUSTOMERSorTRANSACTIONS) -
Select the appropriate connector (e.g.,
hnm_connector). -
Choose the respective table from your data source.
-
Wait for column types to be inferred based on sample statistics. If this takes too long (this can happen in SPCS deployments when the warehouse you are using is busy), skip the inferring and set the column types manually. Follow these steps:
-
Check the type of each column: The type of a column refers to how the data is later encoded. Kumo supports preprocessing for the following generic types:
- Numerical: Integers and floats where the ordering of numbers from lower to higher values has semantic meaning (e.g., product price, percentage discount).
- Categorical: Boolean values or string values typically only a single token in length, with limited semantic meaning, and up to 4000 unique values (e.g., premium subscription status).
- Multi-categorical: Comma-separated variable length lists of categorical values (e.g., a list of product attributes or categories).
- ID: Columns that correspond to primary or foreign keys in a relational schema. (e.g., customer ID, product group number).
- Text: String values with multiple tokens in length, where the content has semantic meaning (e.g., product description).
- Timestamp: String or format-specific date/timestamp values (preferably ISO 8601). Ensure date/time format is valid.
- Image: URL strings that link to accessible images used for visualization purposes only. Processing of images within Kumo models will be available in future releases.
- Embedding: Lists of floats, all of equal length; typically the output of another AI model.
-
Check the data type: This refers to the underlying data type. Data type checking is especially relevant for connecting tables later, as only columns with the same type can be connected via a Primary/Foreign key link. No modification is needed for data types for the H&M dataset.
-
Set the primary key: This is the unique identifier column of a table and is used later within the Primary/Foreign key connection.
-
Set a create date: For tables that correspond to real-world events (such as transactions), this is the time that the even took place in the real world. Kumo uses this to automatically prevent data leakage during training time, which is a very common mistake when building models by hand.
-
-
Verify that all properties are set correctly prior to saving:
-
ARTICLES:
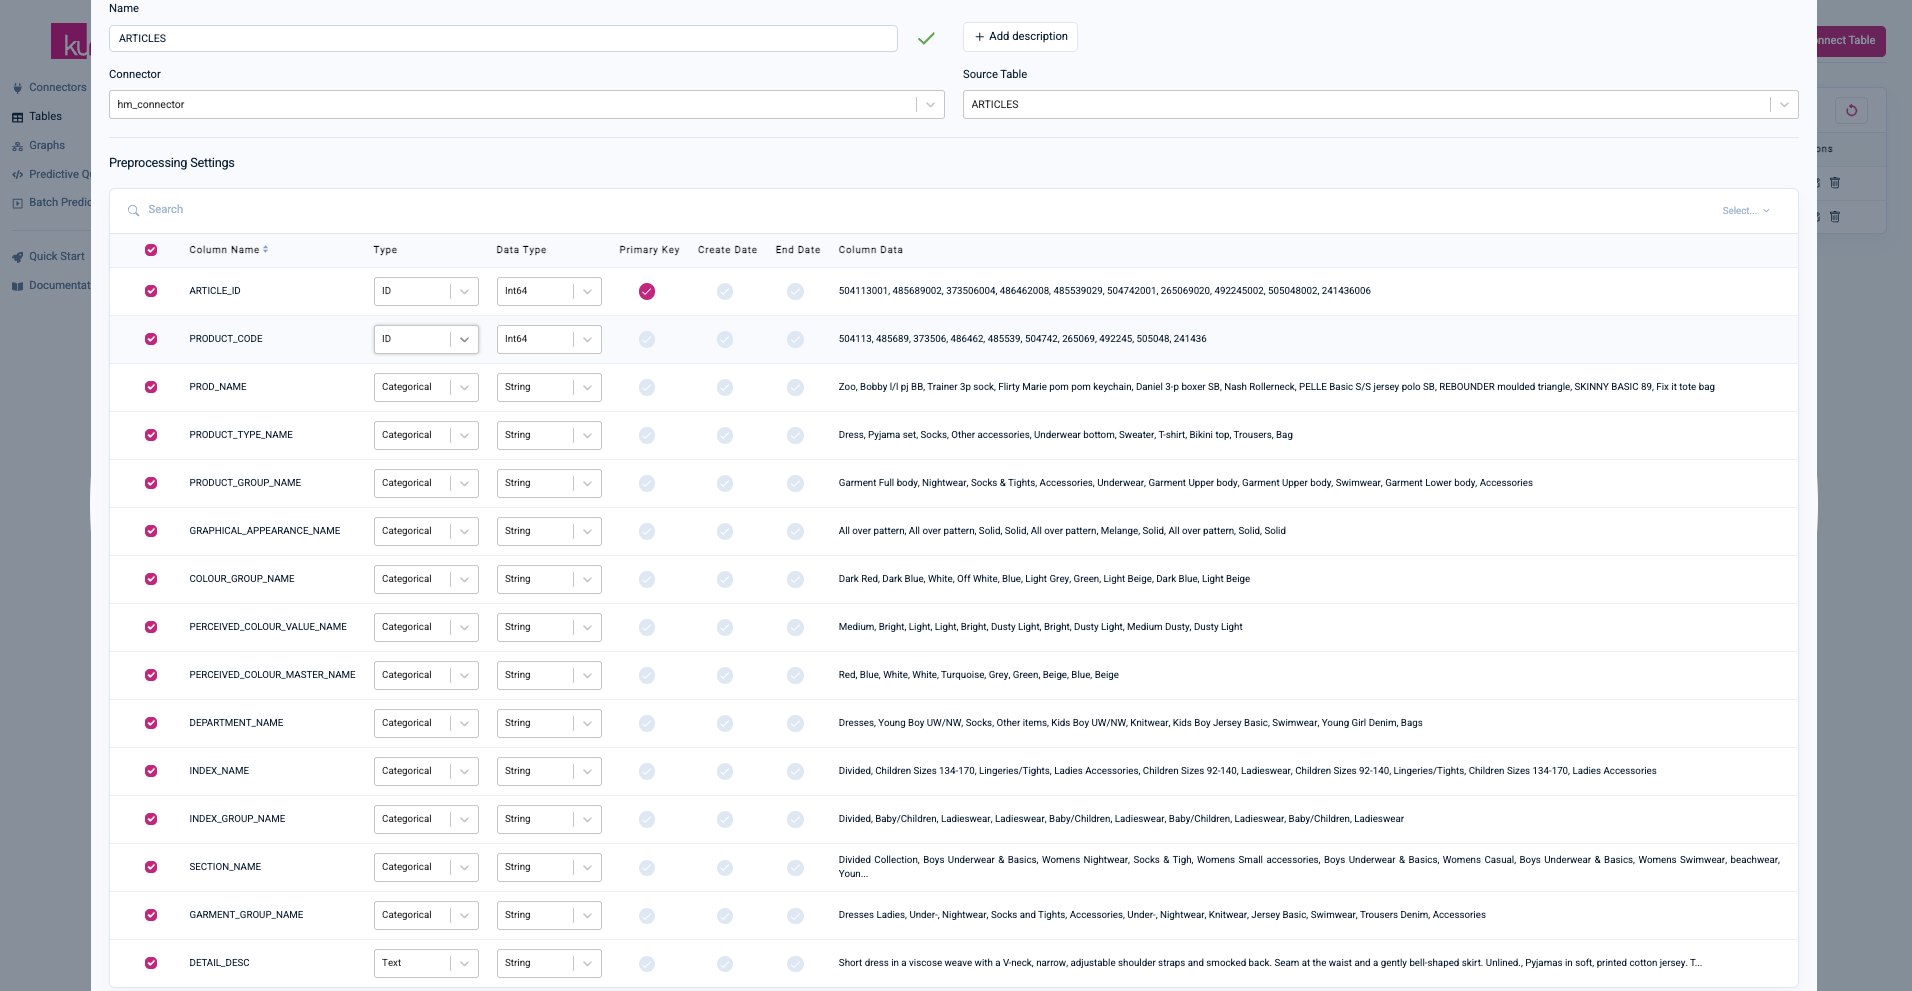
-
CUSTOMERS (the warnings can be ignored):
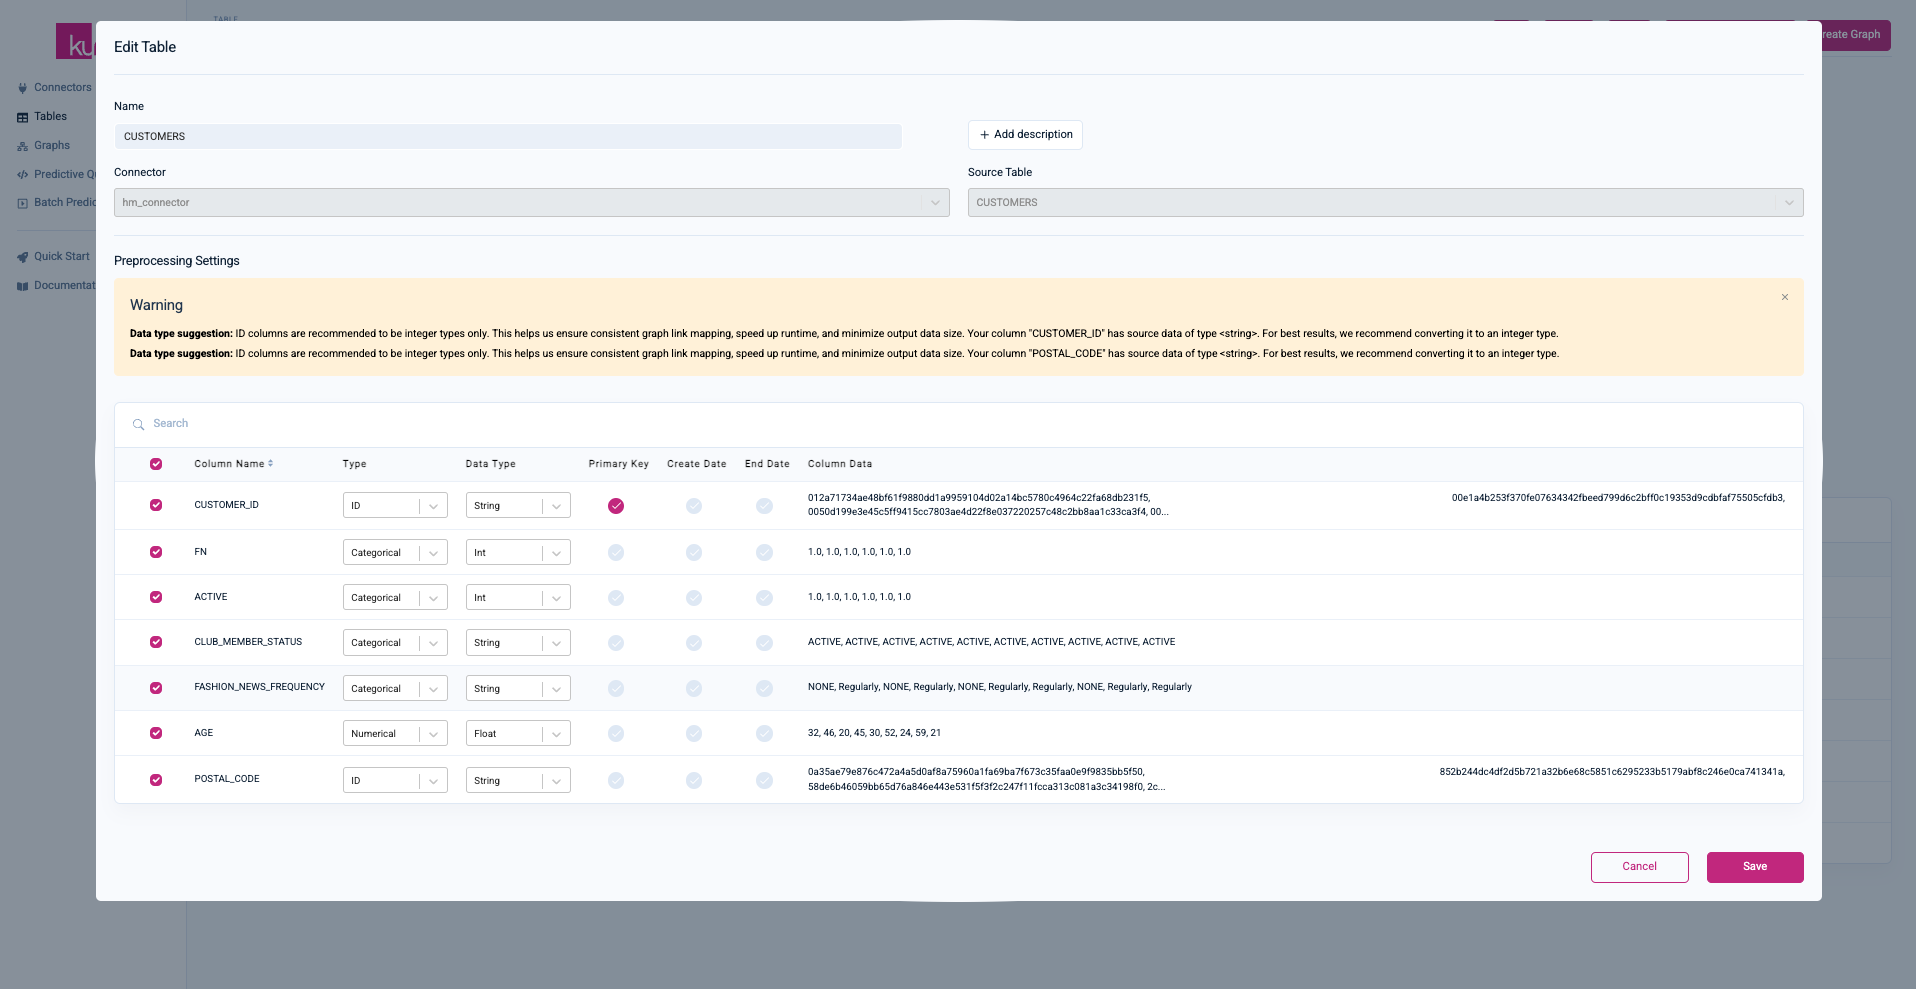
-
TRANSACTIONS:
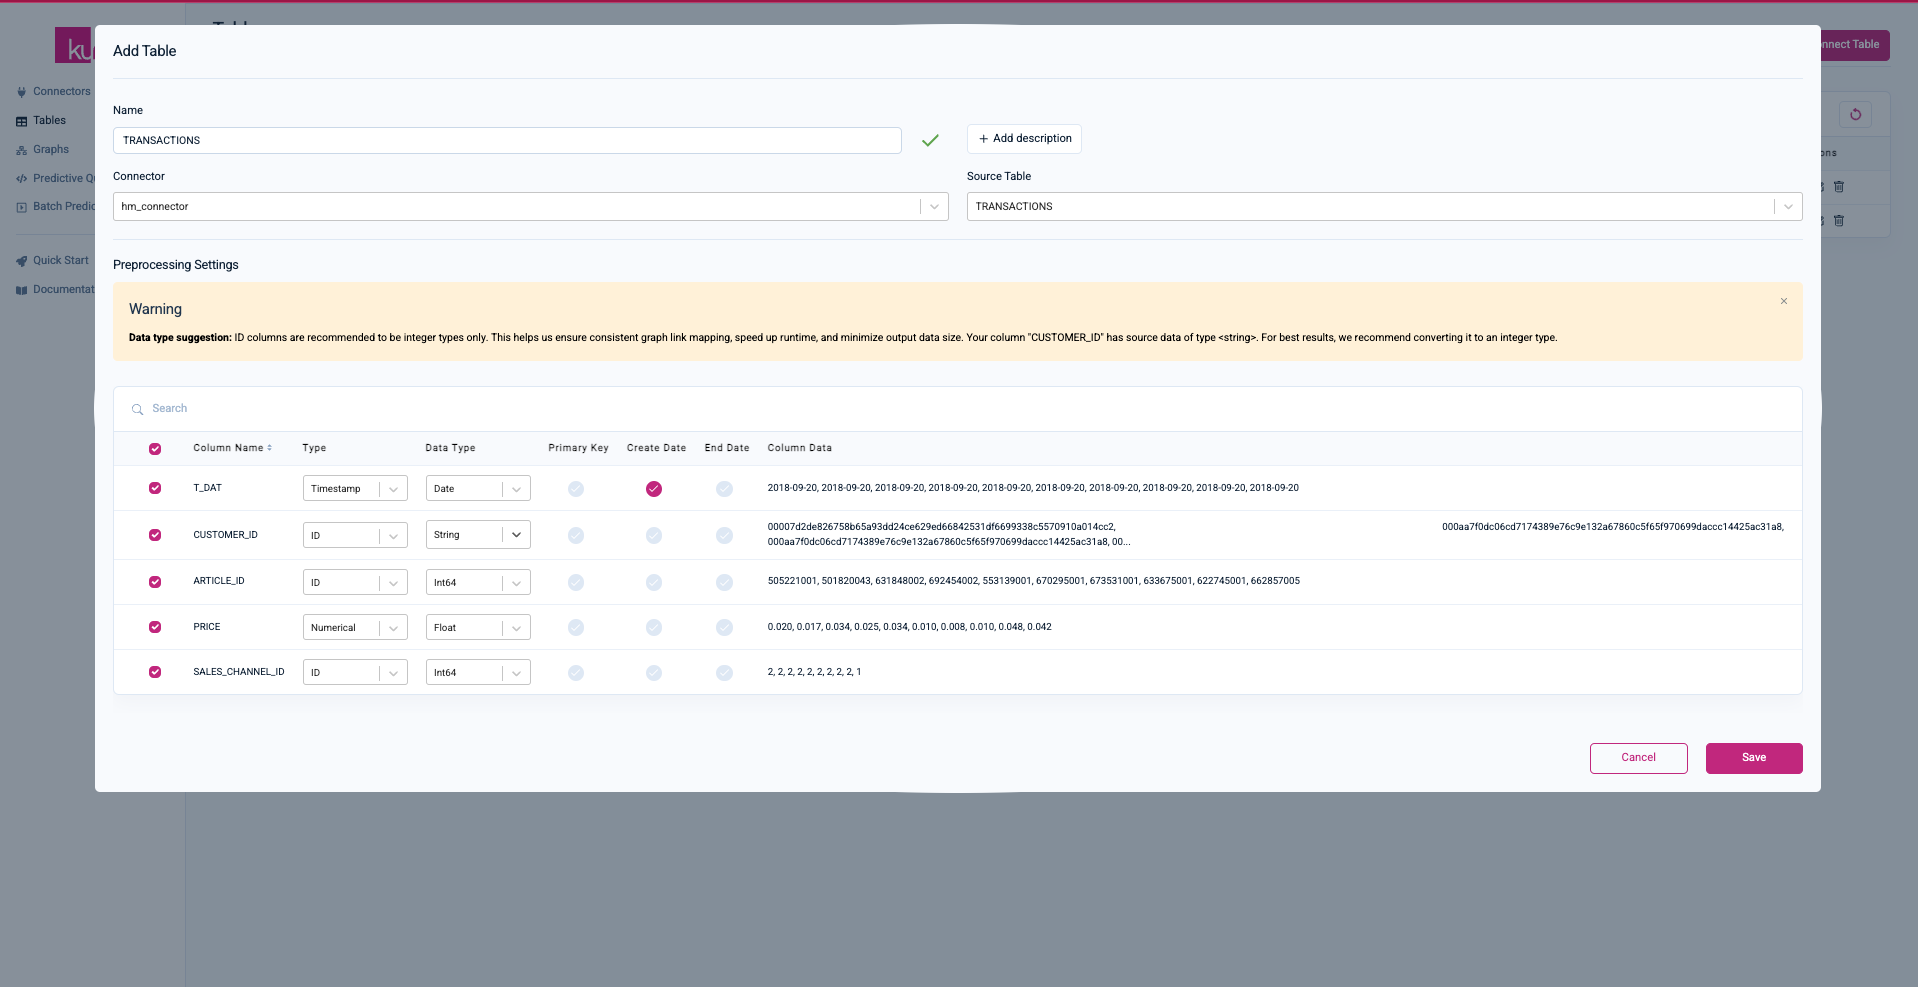
-
-
Click
Saveto save each table.
-
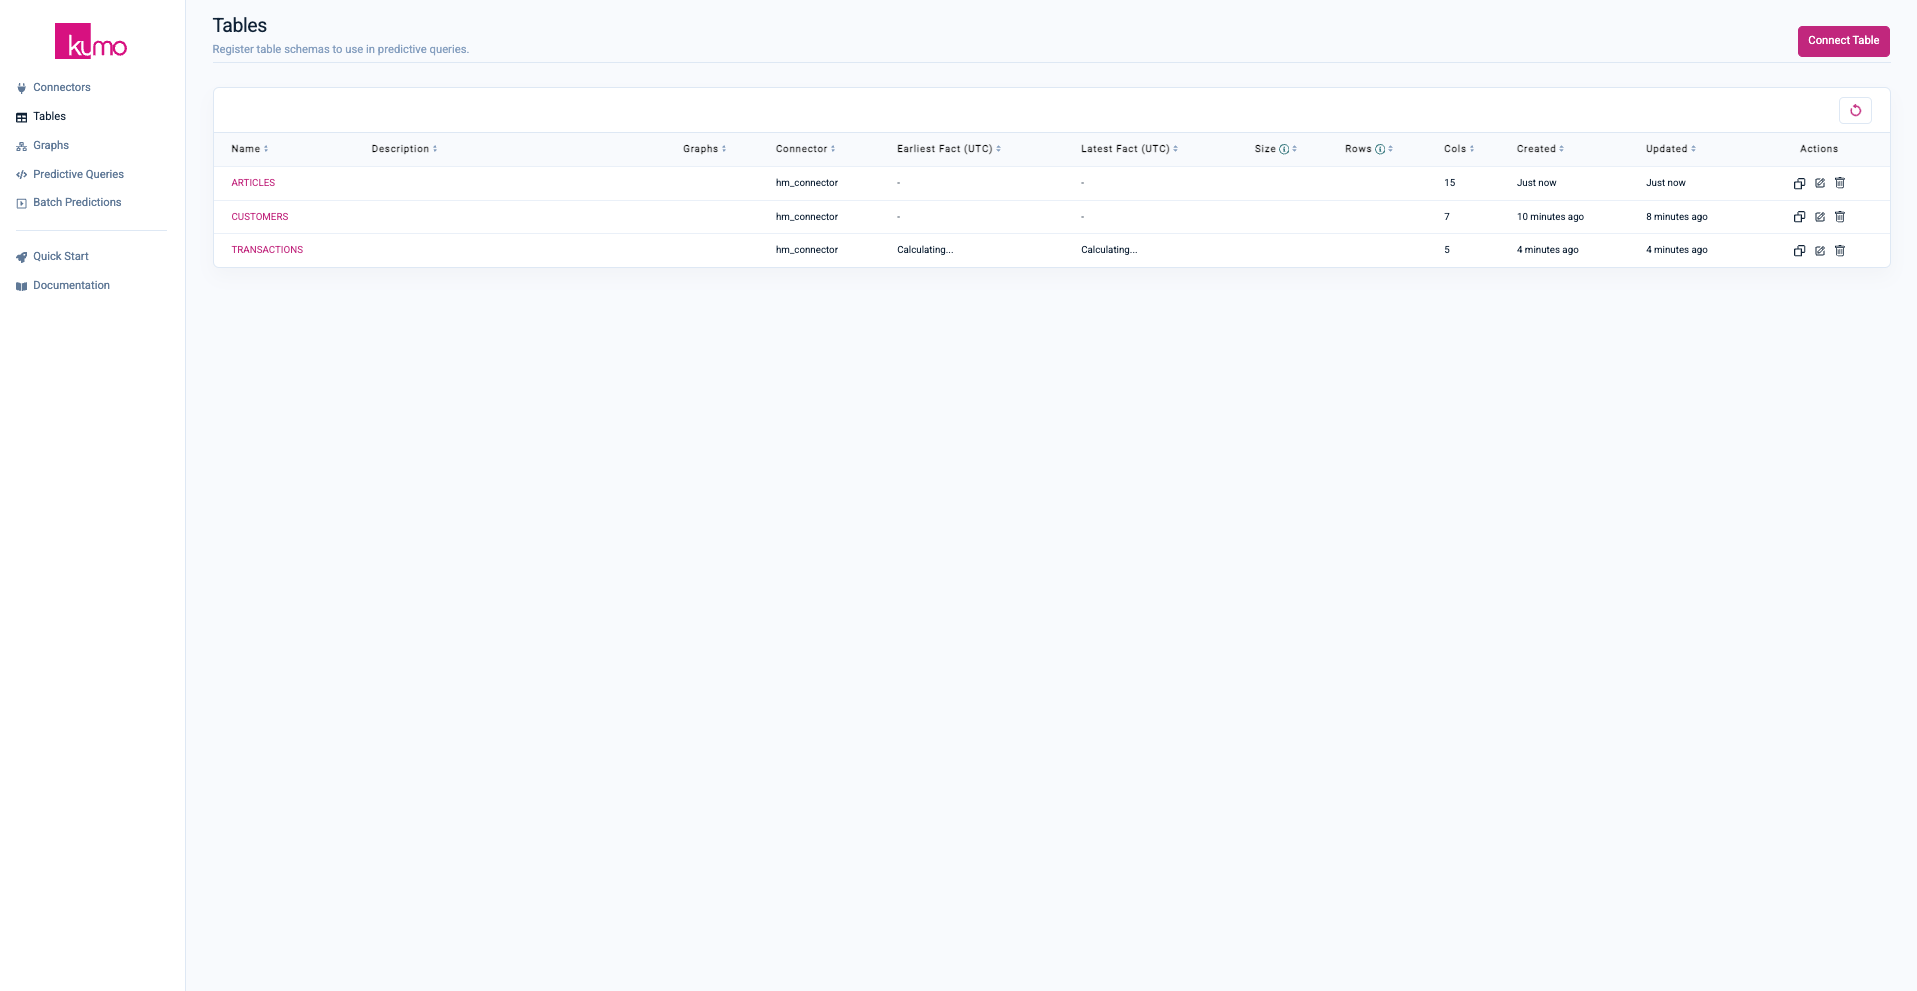
Within the Tables page, you should now see three tables:
Step 3: Create a Graph Schema
Now that your tables are registered, it's time to define the graph schema, which specifies how your data tables are connected. This step is crucial for using GNNs effectively.
-
Navigate to Graph Setup:
- In the left-hand menu, click on
Graphs.
- In the left-hand menu, click on
-
Create a New Graph:
i. Click
Create Graphin the top right-hand corner.ii. Provide Graph Details:
- On the "Graph Setup" page, provide a name for your new graph (e.g.,
hnm_graph).
iii. Select Tables:
- Select the
TRANSACTIONS,CUSTOMERS, andARTICLEStables by checking the respective boxes.
iv. Configure Graph Links:
- Click the
Nextbutton on the top right-hand corner. - Kumo will automatically detect and suggest linkages.
- Verify the linkages:
- Ensure
CUSTOMER_IDinCUSTOMERSis linked toCUSTOMER_IDinTRANSACTIONS. - Ensure
ARTICLE_IDinARTICLESis linked toARTICLE_IDinTRANSACTIONS.
- Ensure
- Click the
Confirm Groupbutton for both column groups.
v. Complete Graph Creation:
- Click on the
Complete Graph Creationbutton on the top right-hand corner.
- On the "Graph Setup" page, provide a name for your new graph (e.g.,
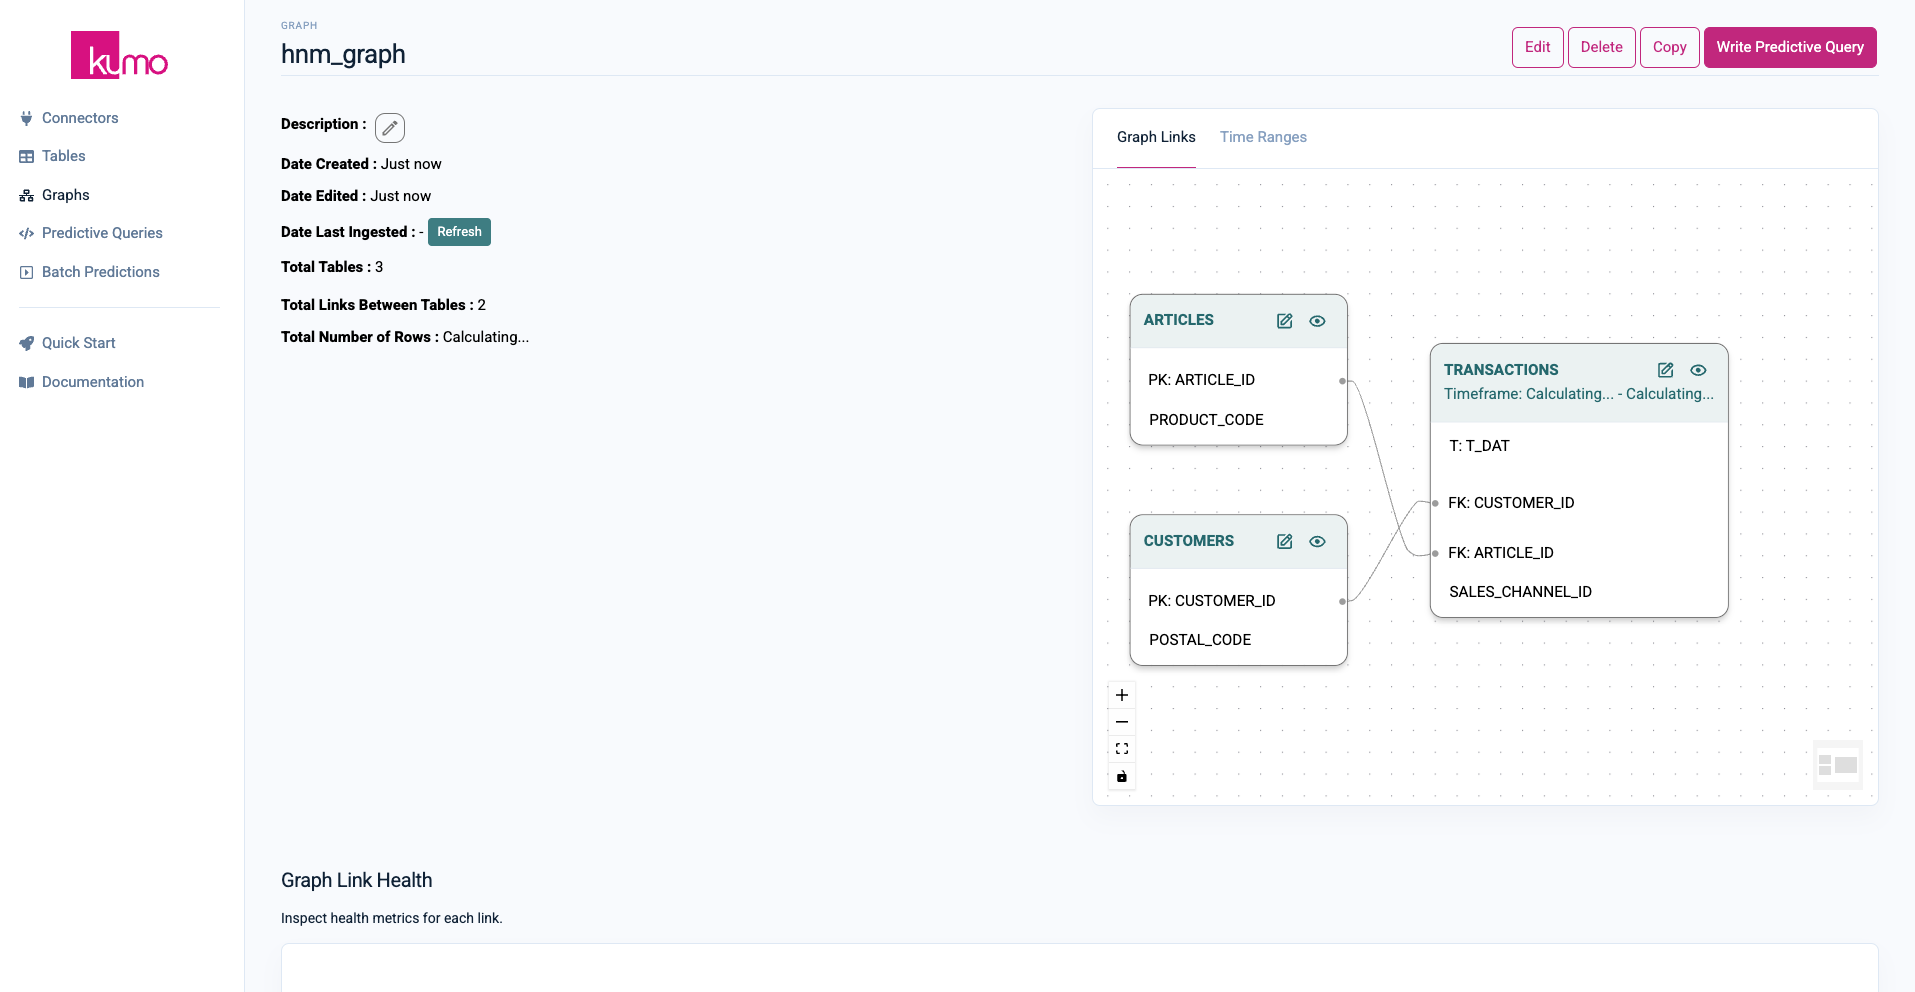
With this, all preparation is done. You should see the following graph now:
Step 4: Train Your First Model via PQL
After specifying the graph, you can train a model using Kumo's predictive query language (PQL). PQL helps specify the training table, defining the target and the entity for which you want to make predictions. In this case, you want to predict whether each customer is likely to churn within the next 90 days, focusing on those who have made a transaction within the last 60 days.
-
Open Predictive Query Creation:
- Click on
Write Predictive Queryin the top right-hand corner.
- Click on
-
Train Model via a Predictive Query:
i. Provide a name for your predictive query (e.g.,
hnm_churn).ii. Select the graph you created earlier from the drop-down menu.
iii. Specify predictive query:
- In the predictive query text area, insert the following PQL statement to predict whether a customer that has made a transaction within the last 60 days is likely to churn within the next 90 days:
The query defines how the training data is automatically generated. In this example, Kumo will split the timeline of transaction data into intervals of 90 days, training the model to predict each customer's future number of transactions, and whether they will be greater than 0 within the next 90 days based on their transaction history, training for each of the past timeframes. During evaluation and future predictions, the model will respond with the likelihood of no transactions, evaluating against the actual number of transactions.
PREDICT COUNT(TRANSACTIONS.*, 0, 90, days) = 0
FOR EACH CUSTOMERS.CUSTOMER_ID WHERE COUNT(TRANSACTIONS.*, -60, 0, days) > 0
iv. Click
Nextto specify the Model Planner.- You can use the default settings for now; however, when training models on your own data later, you can change these settings to influence the model architecture used, the number of examples trained, and more.
v. Click
Save and Train.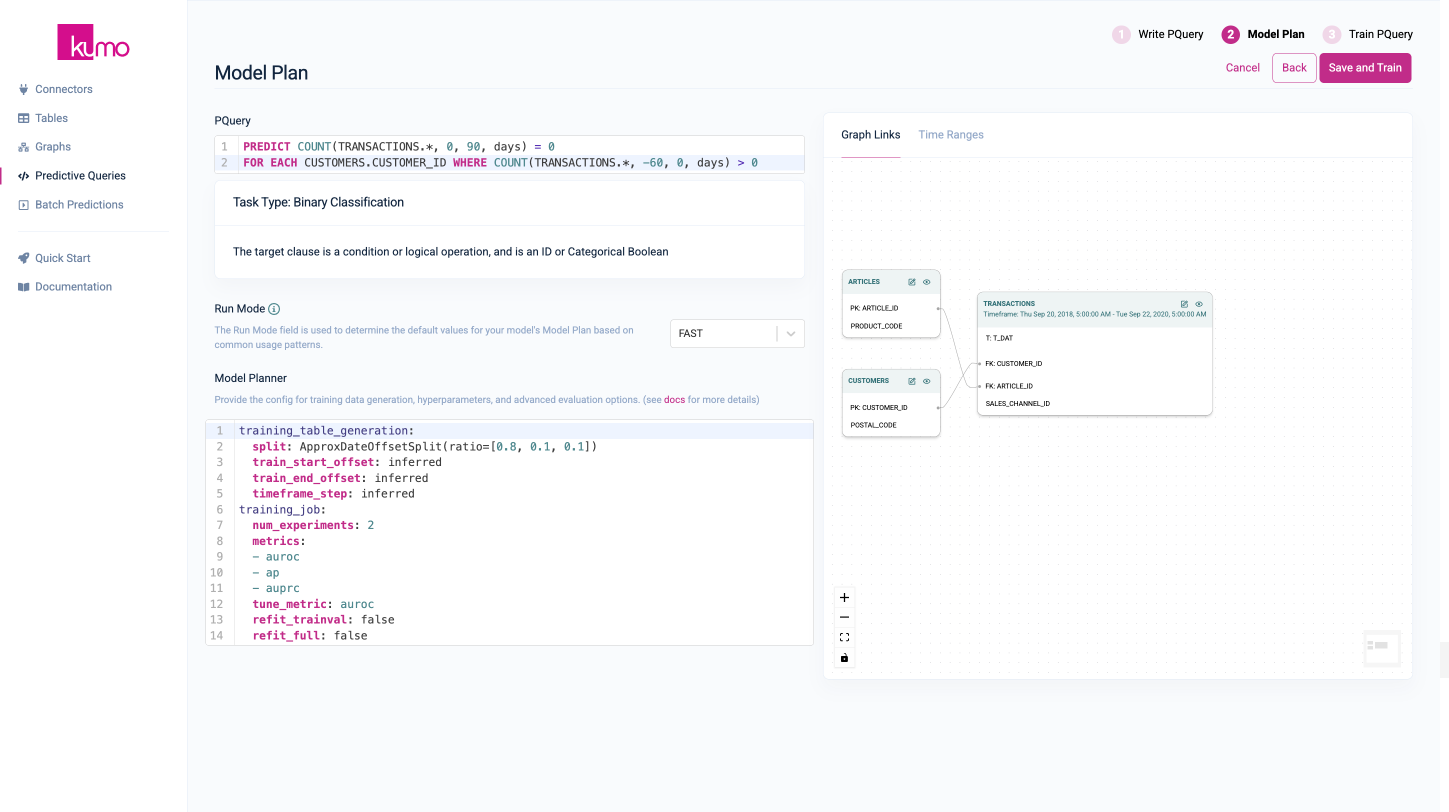
- In the predictive query text area, insert the following PQL statement to predict whether a customer that has made a transaction within the last 60 days is likely to churn within the next 90 days:
Congratulations, you have started training your first model! This can take a few minutes as Kumo ingests the data, encodes the columns, builds the computation graph, trains the models, and evaluates the models. You can follow the process as Kumo will show training table statistics and metric curves such as loss curves.
When the training is complete, take a look at the results by:
-
Checking out the evaluation metrics within the evaluation tab.
-
Inspecting the holdout set either via the
Downloadbutton or via the shown SQL command within Snowflake for SPCS deployments . -
Explore example predictions in our explorer tab, which shows you the specific predictions made by the model and how they match the actual outcomes.
Conclusion
🚀 You have now successfully created and trained your first predictive model using Kumo. Here is a summary of what was covered in this Quick Start:
- Set Up Your Connector: Connected your data source to Kumo.
- Register Table Schema: Defined the table schema.
- Create Your Graph: Defined the relationships between tables.
- Create Your PQuery: Wrote and trained models via a predictive query to make predictions.
Next, you can start training models on your data. To learn how to write a predictive query, take a look at the Predictive Query Tutorial. Additionally, you can learn how to create batch predictions or how to productionize your model.
Updated about 2 months ago